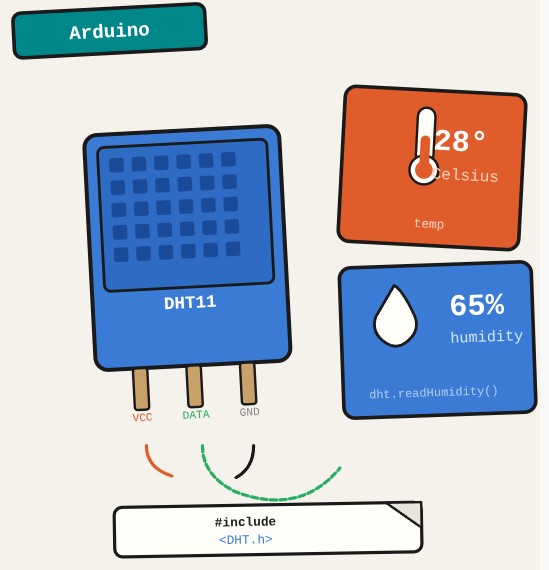
The DHT11 is a basic temperature and humidity sensor that outputs digital readings. It costs almost nothing and works out of the box with Arduino, but the library setup needs to be done correctly or you get garbage data.
TL;DR: Connect a DHT11 sensor to an Arduino and read temperature and humidity using the DHT library.
Stack: Arduino, DHT11, DHT library
Level: Beginner
Reading time: ~4 min
What is the DHT11
The DHT11 is a temperature and humidity sensor for Arduino. It has 3 relevant pins: power, ground, and data. The data pin connects to a digital pin on the Arduino and returns a single reading per request.
Library
Download the DHT11 library from the project repository and install it via Arduino IDE: Sketch > Include Library > Add .ZIP Library.
Code
#include <dht11.h>
#define DHT11PIN 4

dht11 DHT11;

void setup() {
    Serial.begin(9600);
    Serial.println("System started");
}

void loop() {
    delay(3000);
    Serial.println("Reading sensor...");

    int chk = DHT11.read(DHT11PIN);

    Serial.print("Humidity (%): ");
    Serial.println((float)DHT11.humidity, 2);

    Serial.print("Temperature (C): ");
    Serial.println((float)DHT11.temperature, 2);

    delay(2000);
}
What you’ve built
An Arduino reading temperature and humidity from a DHT11 sensor and printing the values to the serial monitor every few seconds.
Next steps
- Upgrade to a DHT22 if you need better accuracy (±0.5°C vs ±2°C) and wider range. The library and wiring are identical.
- Add a display (LCD or OLED) to show readings without a computer connected.
- Log readings to an SD card or send them over network to build a simple environmental monitoring system.
Questions or feedback? Find me on LinkedIn or GitHub.